React remains one of the most powerful tools for building modern web applications. But performance can suffer as apps grow — especially when component trees deepen, user interactions increase, and JavaScript bundles expand. That’s why React performance optimization is more critical than ever. The good news is that React’s ecosystem in 2025 offers more tools than ever for keeping your UI fast, responsive, and smooth.
In this guide, we’ll walk you through 10 practical, up-to-date techniques for effective React performance optimization— from core concepts like memoization and re-renders, to advanced tools like concurrent rendering and Server Components in Next.js.

React Performance Optimization Checklist for 2025
If you’re looking to boost your app’s speed, reduce re-renders, and deliver a better user experience, start here:
- Understand what triggers re-renders (props, state, context, parent renders)
- Use React.memo() intelligently to prevent unnecessary renders
- Leverage useCallback and useMemo for reference stability
- Split your codebase with React.lazy and dynamic imports
- Optimize React Context usage by limiting scope and re-render triggers
- Use concurrent features like useTransition and useDeferredValue for responsiveness
- Virtualize large lists and always use stable, unique key props
- Avoid anonymous functions in JSX, especially when passing props
- Profile and measure continuously using React DevTools and Web Vitals
- Use Server Components in Next.js to reduce client-side JavaScript and hydrate faster
We’ll explain each technique in depth, with code examples, real-world tooling, and internal links to help you go even deeper. Whether you’re maintaining a legacy app or launching a new product in 2025, these strategies will help you ship better front-end experiences — and scale them sustainably.
1. Understand What Triggers a Re-render
Getting the best React performance optimization starts with a deceptively simple question: What causes this component to re-render? The answer may seem straightforward, but understanding the nuance is essential to building fast, efficient user interfaces.
React’s Rendering Model (2025 Snapshot)
In React, a component re-renders when:
- Its state changes (via useState, useReducer)
- Its props change
- It consumes a React context, and the context value changes
- Its parent component re-renders (and it’s not memorized)
Even with React’s latest concurrent rendering capabilities in 2025, these fundamentals remain true. Developers who understand this lifecycle can better predict behavior, reduce unnecessary updates, and build smoother apps at scale.
The Cost of Unnecessary Re-renders
Not every render is problematic — React is built to handle frequent updates. However, excessive or unnecessary re-renders can compound across a component tree, leading to sluggish user interfaces, higher memory usage, and increased time-to-interactive (TTI).
According to research from Bit.dev, poor render performance can lead to a 30–60% increase in scripting time, particularly in applications with deep trees or shared context. In real-world projects, this can translate into hundreds of milliseconds lost during critical rendering paths — a measurable hit to both UX and SEO.
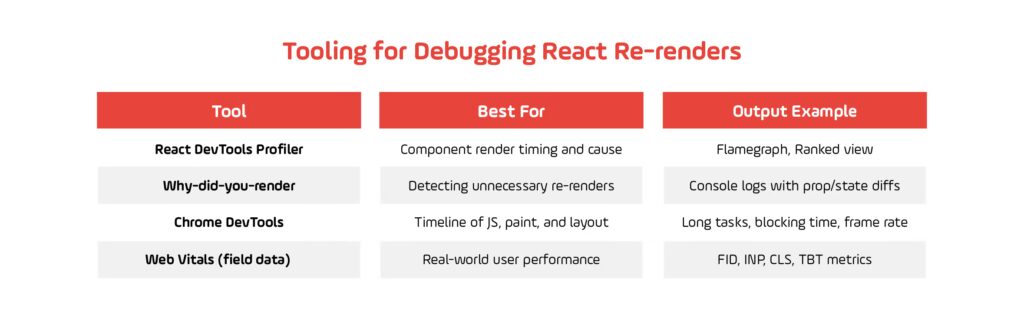
Tools to Diagnose Re-render Behavior
Before thinking of the best react performance optimization, it’s important to visualize what’s happening during renders. Several tools are available to help you do this.
1. React DevTools Profiler
The React Profiler, built into React DevTools, helps identify:
- Which components rendered
- When they rendered
- How long each render took
- What triggered the render (e.g. a specific prop or state change)
Image suggestion: Include a screenshot of React Profiler’s flamegraph view, annotated to highlight a component with long render time.
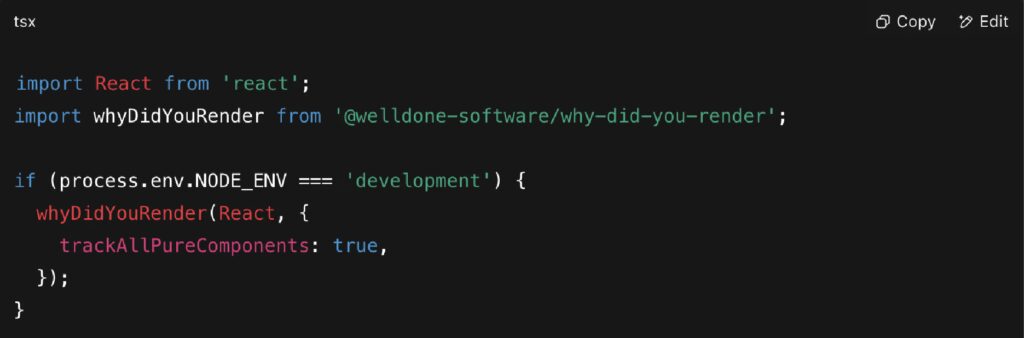
2. why-did-you-render
This development-only library adds helpful console warnings when React components re-render without any actual prop or state change. It’s especially useful when working with React.memo() or pure components.
Basic usage:
3. Chrome DevTools Performance Tab
The browser’s Performance tab provides deeper insight into rendering behavior. You can track:
- JavaScript execution time
- Frame rendering
- Long tasks
- Paint and layout shifts
Combined with tools like Web Vitals, this gives a real-world view of how render performance impacts metrics like:
- First Input Delay (FID)
- Interaction to Next Paint (INP)
- Total Blocking Time (TBT)
Measure Before You Optimize
At Growin, we follow a core principle when it comes to React performance optimization in apps:
“If you didn’t measure it, don’t optimize it.”
Optimizing too early — or without data — often leads to unnecessary complexity. Profiling helps you focus only on components that truly need attention.
Use profiling tools to identify:
- Components with high render frequency
- Components with high render cost
- Context or prop patterns causing unnecessary updates
This lays the foundation for using tools like React.memo() or state libraries more strategically, which we’ll cover in the next section.
2. Use React.memo() Intelligently
One of the most common ways to improve and get the best React performance optimization is to prevent unnecessary component re-renders — especially when prop values haven’t changed. That’s where React.memo() comes in. But like any optimization tool, it’s effective only when used with intent.
What Is React.memo()?
React.memo() is a higher-order component that memoizes the result of a component’s render. If the component’s props don’t change between renders, React skips rendering and reuses the last output.
Here’s a basic usage example:

This is functionally equivalent to a pure component — but only at the shallow prop level. This means if any prop is an object or array that changes reference (even with identical content), it will still trigger a re-render.
When Should You Use It?
Use React.memo() when:
- The component is pure and only depends on props for rendering.
- Re-renders are frequent and avoidable.
- The component renders complex DOM or expensive computations.
- Children or sibling components are memoized, and you want to isolate changes.
However, avoid using React.memo() on:
- Small, fast-rendering components where render cost is negligible.
- Components with rapidly changing props.
- Components with non-trivial props (like deeply nested objects) unless paired with custom comparison logic.
Adding a Custom Comparison Function
If your component accepts complex props like arrays, objects, or functions, you can pass a custom comparison function to React.memo() to determine whether it should re-render:
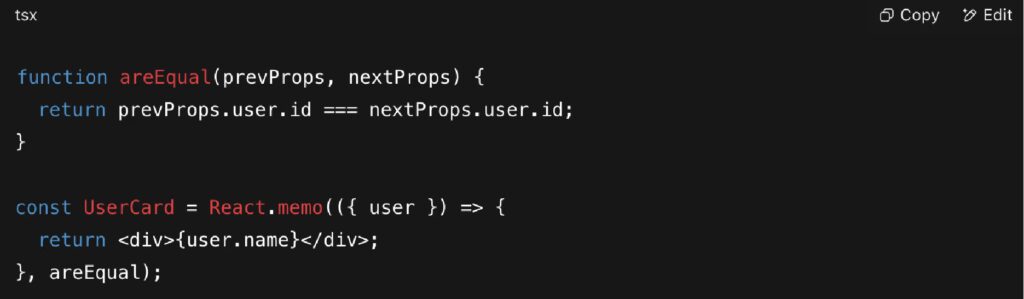
While this improves control, it can add complexity and debugging overhead — use it only when profiling shows a meaningful benefit.
Real-World Gains
When used properly, React.memo() can reduce re-renders by 30–50% across large lists or frequently updated components. In one internal Growin performance audit, memoization helped cut re-render count by over 40% on a product listing page with complex cards.
For reference: Memoization Performance Study – LogRocket
Performance Pitfall: Shallow Comparisons
A common issue arises when passing inline objects or functions:

This causes the component to re-render on every update because the object’s reference changes each time.
Better:

Or move the object outside the component if it’s static.
Pairing with useCallback and useMemo
To get full benefit from React.memo(), pair it with useCallback() for event handlers and useMemo() for computed props:
We’ll explore these hooks in the next section, but remember: reference stability is essential when memoizing children.
When React.memo() Can Hurt
There is a cost to memoization. React must store the previous props, compare them, and make a decision — this adds overhead. If your component is fast to render and frequently changing, this comparison step may become more expensive than the render itself.
If in doubt, measure first. React DevTools Profiler will show you whether a component re-render is expensive enough to justify memoization.
3. Leverage useCallback and useMemo Purposefully
In React development, especially as applications grow more interactive and component-driven, it’s easy to introduce performance issues without realizing it. Two of the most commonly misused — but powerful — hooks for react performance optimization are useCallback and useMemo.
Used correctly, they help stabilize function and value references between renders. Used unnecessarily, they can clutter your code and even degrade performance.
What These Hooks Actually Do
- useCallback(fn, deps) returns a memoized version of the function that only changes if dependencies change.
- useMemo(fn, deps) returns the memoized return value of a computation if dependencies haven’t changed.
In short, both help avoid unnecessary recalculations or re-renders caused by changing object or function references.
Why Reference Equality Matters
React components (especially memoized ones via React.memo) perform shallow comparison of props. This means:
- New object/function = “different”, even if the logic or values inside didn’t change.
- This leads to prop-triggered re-renders, which can become costly.
Example:

Every render creates a new function. If Child is wrapped in React.memo, it will re-render anyway, defeating the purpose.
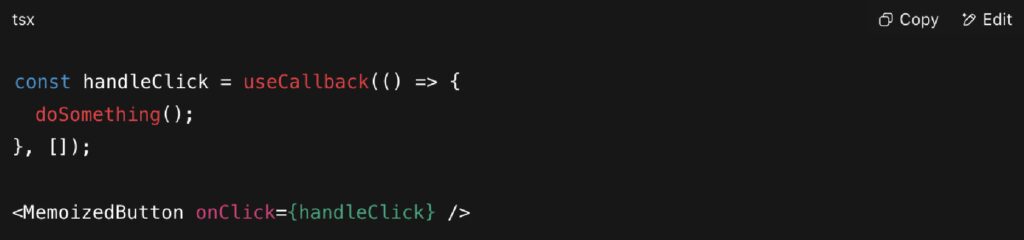
Refactored:
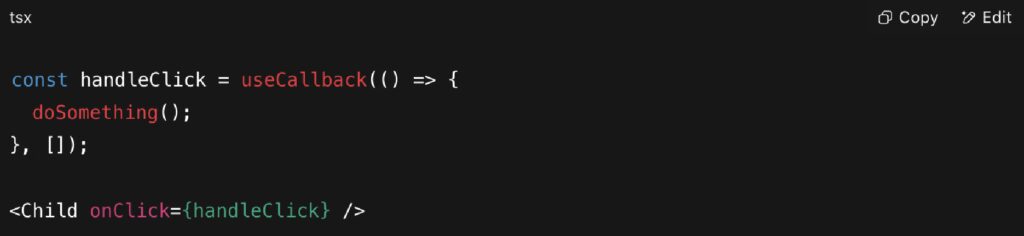
Now, onClick has a stable reference, so Child won’t re-render unless necessary.
When useCallback Is Worth It
Use useCallback when:
- You pass functions to memoized child components.
- You’re creating event handlers inside functional components.
- The function is stable between renders unless dependencies change.
Don’t use it:
- On functions not passed as props.
- For trivial logic that’s cheap to re-create.
- Unless profiling proves re-renders are problematic.
When useMemo Adds Value
Use useMemo for:
- Expensive computations (e.g., filtering, sorting, math-heavy transforms)
- Creating derived data from props or state
- Preventing object/array prop changes that could trigger unnecessary child renders
Example:

Avoid this pattern for small, fast operations — the overhead of memoizing and managing dependencies may cost more than recomputing.
A Measured Approach
According to Kent C. Dodds, the cost of using useCallback and useMemo improperly can outweigh their benefits. He recommends applying them only when performance is affected and confirmed through profiling.
At Growin, we follow this practice closely during performance audits. In one client’s dashboard with dozens of charts and filters, targeted use of useMemo on filtering logic helped reduce computation time by 45% on each update.
Debugging Tip
React DevTools lets you track prop changes in memoized components. If a child keeps re-rendering due to a new function or object prop, it’s a good signal to use these hooks.
4. Embrace Lazy Loading with React.lazy and Code Splitting
As your React application grows, so does your JavaScript bundle. And with that, load times increase — especially for users on slower devices or networks. Code splitting and lazy loading allow you to load only what’s needed, when it’s needed, significantly improving perceived performance.
React provides built-in tools for this: React.lazy() and Suspense. When combined with route-level code splitting or dynamic imports, these tools offer a reliable and modern solution to optimize loading behavior in 2025.
Why Bundle Size Still Matters in 2025
Even with modern frameworks like Next.js and build tools like Vite or Webpack 5, JavaScript is still one of the biggest bottlenecks in web performance.
According to HTTP Archive (2024 data), the median JavaScript payload for desktop users is over 500 KB, with mobile users often downloading significantly more. Large bundles:
- Increase Time to Interactive (TTI)
- Hurt Core Web Vitals like First Contentful Paint (FCP) and Interaction to Next Paint (INP)
- Waste bandwidth, especially on mobile or limited data plans
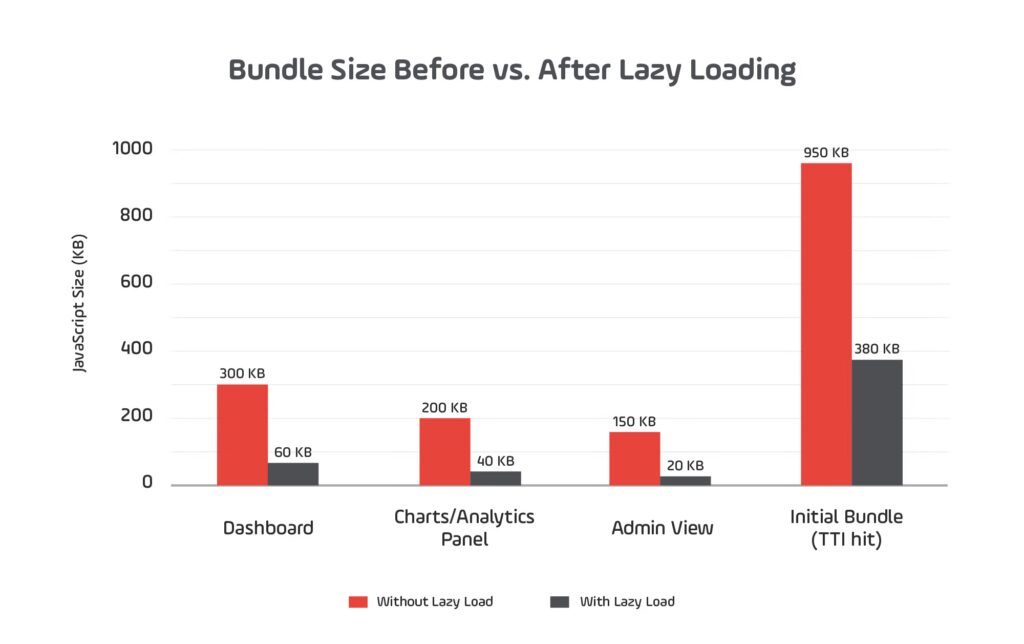
Lazy loading components can help reduce initial bundle size by 20–70%, depending on the complexity of your app.
How to Use React.lazy() and Suspense
React’s lazy() function enables on-demand loading of components, and Suspense defines the fallback UI while the module loads.
Example:
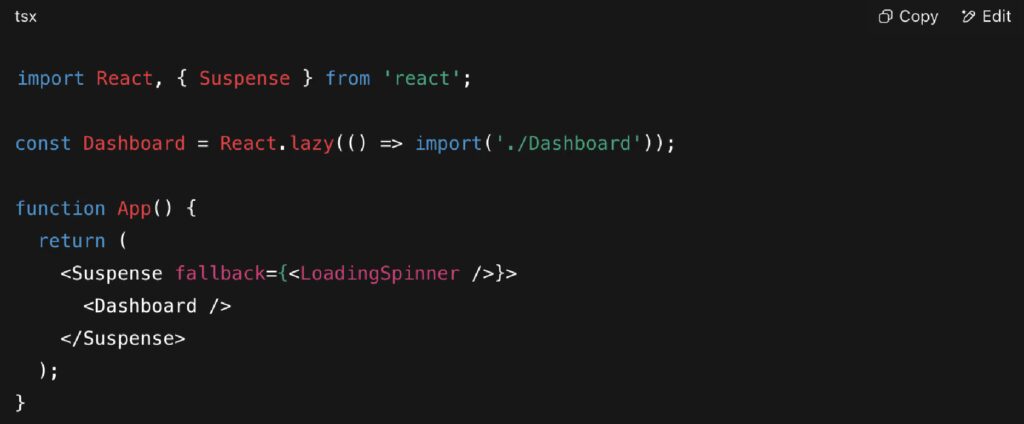
This splits the Dashboard component into a separate chunk that’s loaded only when needed.
Where to Apply Lazy Loading
- Route-based components (dashboards, pages, modals)
- Rarely used views (admin screens, settings panels)
- Heavy UI blocks (charts, editors, maps)
- 3rd-party integrations (video players, PDF viewers)
Avoid lazy loading:
- Essential above-the-fold components
- Fast-rendering elements needed immediately
Framework-Level Code Splitting
If you’re using frameworks like Next.js or Remix, route-level code splitting is often built in. In Next.js App Router (since v13), React Server Components (RSC) also improve performance by eliminating unnecessary client-side JS for static or async UI.
Example: In Next.js App Router:
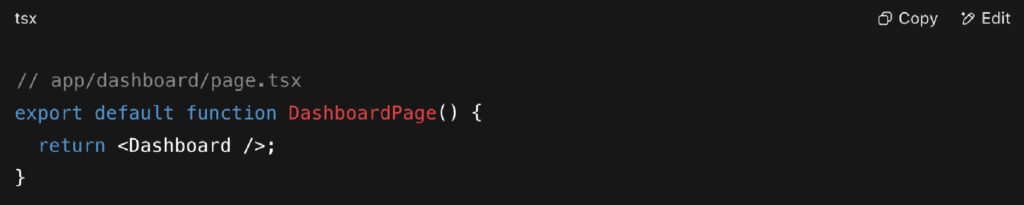
This page is automatically split and server-rendered, with client components loaded as needed.
Bundle Insight Tools
To make sure your code splitting efforts are paying off, use tools like:
- Webpack Bundle Analyzer – Visualizes what’s inside your bundle
- Source Map Explorer – Helps track down large imports
- Next.js Analyzer – Optimized for Next apps
5. Optimize Context Usage
React’s Context API is a powerful way to share data across components without prop drilling. But by default, any context update causes all consuming components to re-render, regardless of whether they use the updated value. In larger apps, or ones with global state, this can introduce serious performance bottlenecks.
Understanding how React Context works — and how to structure it — is critical for scaling performant front-end applications in 2025.
Why Context Can Be a Performance Bottleneck
When a context value changes, React re-renders every component that consumes it, regardless of whether their usage actually depends on the changed data. This is by design — context updates are treated as top-level broadcast changes.
This is fine for small, infrequently updated data like themes or locale. But for frequently changing state (like authentication, filters, or user inputs), it can lead to excessive re-renders across your component tree.
Example scenario:
- You use a global <AppContext> for the entire app.
- That context includes both theme and a real-time notificationCount.
- When notificationCount updates, it triggers a re-render of every component using any part of the context — even if they only care about the theme.
Strategies to Optimize Context Usage
1. Split Context into Smaller Domains
Instead of a single, catch-all context, split your app’s state into domain-specific contexts:
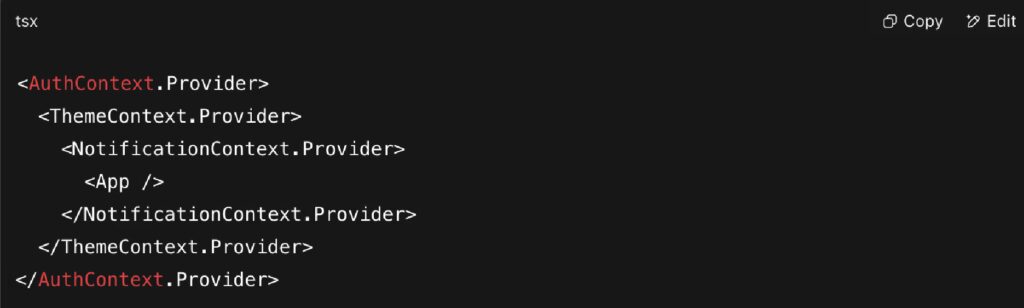
This ensures that updates to NotificationContext only affect components that care about notifications — not the entire app.
2. Use Selectors (with Custom Hooks)
If you must share a larger context, create custom hooks that read only the values needed, and avoid exposing the full context value directly.
This won’t prevent re-renders by itself — but it improves code clarity and opens the door for future optimizations.
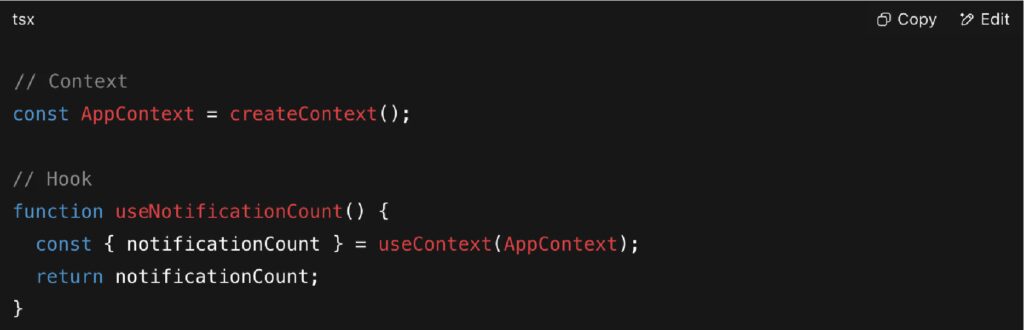
3. Use useContextSelector (from external libraries)
React doesn’t support context selectors natively (yet), but libraries like use-context-selector let you scope updates only to values you care about.

This ensures only components that read notificationCount update when it changes — not every context consumer.
4. Consider Lightweight State Libraries
When Context starts feeling like a global store, it may be time to switch to tools built for that job. Libraries like:
- Zustand – Minimal and performant state container
- Jotai – Atom-based, React-friendly state management
- Valtio – Proxy-based state with automatic tracking
These tools offer finer-grained updates and better performance in complex apps, without the boilerplate of Redux or the re-render pitfalls of Context.
When Context Is the Right Tool
Context is still an ideal solution for:
- Static or rarely changing data (themes, user language, feature flags)
- Dependency injection (passing down services, configs, or clients)
- Avoiding prop drilling for global concerns
But for dynamic, frequently updated state, it’s often better to either:
- Move state closer to where it’s used, or
- Replace Context with a state management solution that avoids broad re-renders
6. Use Concurrent Features Wisely
Since React 18, concurrent features have brought more control over how and when updates happen, allowing developers to build apps that feel smoother without sacrificing responsiveness. By 2025, these features are stable, widely supported, and integrated into frameworks like Next.js, Remix, and Gatsby.
Understanding when and how to apply features like useTransition and useDeferredValue can help you optimize for UX and interactivity — especially in data-heavy interfaces or real-time search experiences.
What Is Concurrent Rendering?
Concurrent rendering lets React pause, interrupt, and resume rendering work. This enables better prioritization of updates — for example, responding to a click immediately, while deferring a slow filter update.
You don’t need to enable this manually — it’s the default behavior in modern versions of React. But to take full advantage of it, you need to use the right hooks.
1. useTransition: Prioritize UX Responsiveness
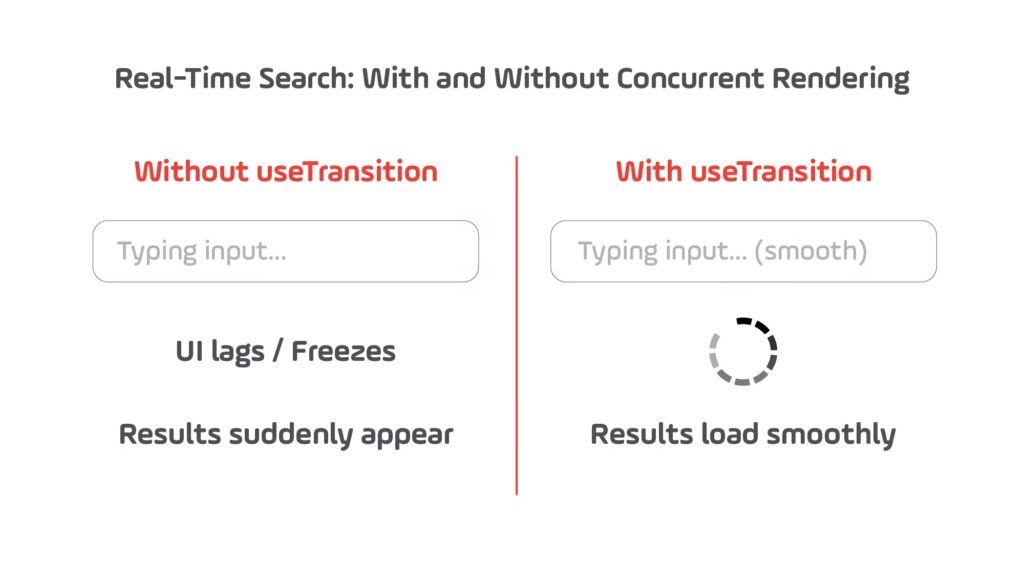
useTransition() lets you mark updates as non-urgent. React will defer these so that more important interactions (like typing or clicking) aren’t blocked by slower renders.
Example: Delayed search filter
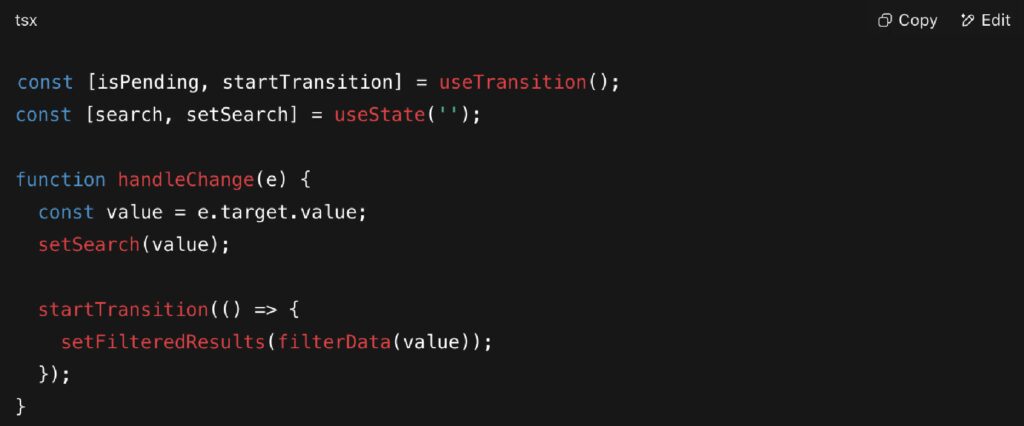
This keeps the input field responsive, even if filterData() is computationally expensive.
Where it’s useful:
- Live search results
- Filtering large data sets
- Rendering charts, tables, or lists based on user input
Note: UI marked with isPending can display a loading spinner or skeleton state without blocking immediate interaction.
2. useDeferredValue: Smoothly Defer Derived Data
While useTransition manages when updates are triggered, useDeferredValue lets you control when expensive values are read.

This is ideal when you want to reflect UI changes immediately (like user typing), but only apply expensive logic slightly later.
Use cases:
- Search boxes
- Typeahead inputs
- Filtering UI
- Reducing “jank” in real-time forms
Good Practices for Concurrent Features
- Use them in interactive views, not everywhere
- Combine with Suspense to display fallback UI while data loads
- Don’t mix with outdated state libraries or render-blocking patterns (like class components without guards)
These hooks don’t magically make your app faster — they prioritize perceived speed, keeping the UI responsive while background work continues.
Framework Support in 2025
Most full-stack frameworks now integrate concurrent rendering by default:
- Next.js (App Router): Full support with useTransition and Server Components
- Remix: Works well with streaming updates and async routes
- Vite + React 18+: Concurrent rendering enabled if you use React DOM with createRoot()
This makes it easier than ever to build responsive experiences across devices — without workarounds.
7. Fine-tune Lists with key and Windowing
Rendering large lists is a classic performance challenge in React. Whether you’re displaying a product catalog, transaction history, or chat feed, the more DOM nodes your app generates, the more likely it is to suffer from slow updates, frame drops, and layout shifts.
Fortunately, React provides two core strategies to address this: proper key usage and windowing (a.k.a. virtualization).
Why List Rendering Can Be Expensive
Rendering a long list (think: hundreds or thousands of items) impacts performance in multiple ways:
- The browser has to manage all those DOM elements
- React has to reconcile updates across all items
- Layout and paint operations become slower
- Memory usage grows significantly
Even when the list doesn’t visibly change, improper key usage or lack of virtualization can make your app feel sluggish — especially on lower-end devices.
Always Use Stable, Unique Keys
React uses key to identify which list items have changed, been added, or been removed. When keys are missing, unstable, or incorrectly generated, React may re-render or re-create entire portions of the list unnecessarily.
Do this:

Avoid this:

Using an index as a key leads to subtle bugs in reordering, filtering, and dynamic updates. React warns against this in the official docs.
Virtualize Large Lists with Windowing
When the list grows beyond 50–100 items, it’s time to consider windowing. This technique renders only the items visible in the viewport, plus a small buffer. As the user scrolls, new items are mounted and old ones are unmounted — drastically reducing render time and DOM overhead.
Recommended libraries:
- react-window – Lightweight and performant
- react-virtualized – More advanced, includes tables and grids
- TanStack Virtual – Framework-agnostic, modern API
Basic usage with react-window:
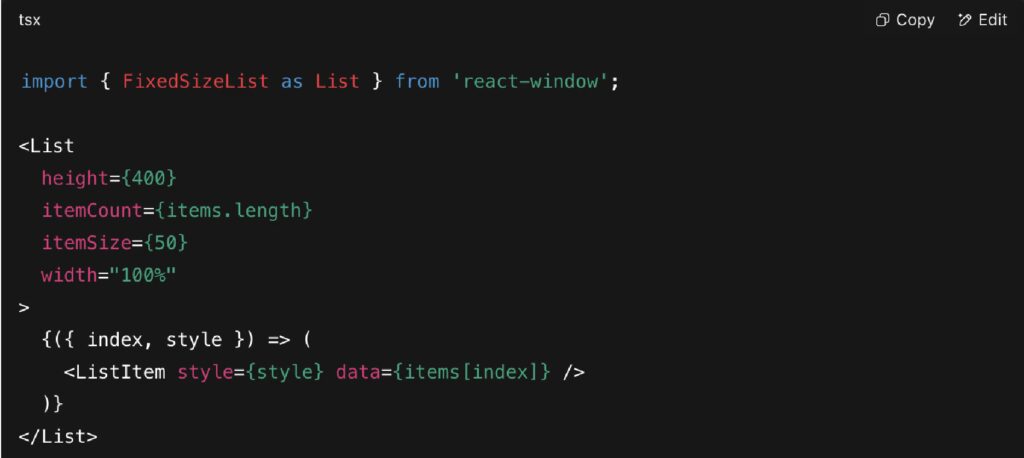
This approach renders only what’s needed — no matter how long the underlying array is.
Additional Tips for List Performance
- Avoid inline functions inside mapped components (onClick={() => …})
- Memoize list items with React.memo if they receive complex props
- Use useMemo to cache filtered or sorted versions of large arrays
- If animations are involved (e.g., with Framer Motion), stagger them to avoid blocking the main thread
8. Avoid Anonymous Functions in JSX (Where It Hurts)
It’s tempting to write concise JSX by inlining functions — especially for event handlers or render logic. While this is convenient, it can have real performance implications, particularly when components are memoized or used in large lists.
Let’s break down why anonymous functions can be problematic in React, and how to safely refactor them.
The Core Issue: New References Every Render
In JavaScript, every time a function is defined inline — whether inside JSX or in a render method — it gets a new identity.

This creates a new function instance on every render. Even if the logic inside doesn’t change, React (or child components) sees a new prop, which can trigger unnecessary re-renders — especially in combination with React.memo().
If MyComponent is memoized:

Then it will re-render every time onClick changes — which it will, if defined inline.
Why It Matters for Lists and Memoized Children
This issue becomes especially noticeable when:
- Rendering lists with hundreds of items
- Passing handlers to memoized child components
- Using these functions as dependencies in useEffect, useCallback, or useMemo
It’s not just about performance — it also increases cognitive overhead when debugging stale closures or unnecessary updates.
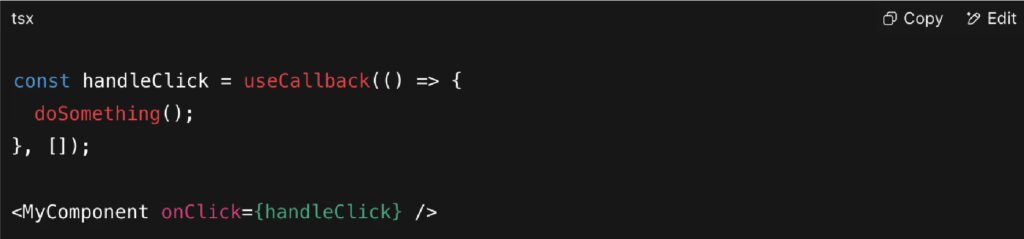
Better: Use useCallback or Predefined Functions
Move function definitions out of JSX to ensure reference stability.
With useCallback:
Or, if the function doesn’t depend on component state or props, define it outside the component entirely:
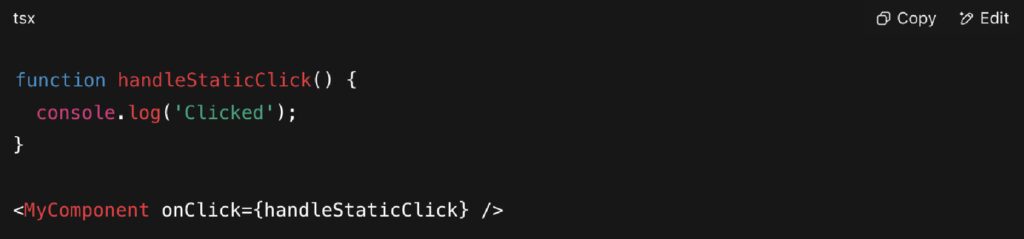
This ensures React doesn’t treat the function as “new” on every render, allowing memoized components to skip unnecessary work.
When It’s Safe to Use Inline Functions
Inlining is generally safe when:
- The component is small and not memoized
- The function is trivial (e.g., () => setOpen(true))
- You’re not passing the function down as a prop to a child component
- Performance profiling shows no meaningful impact
In these cases, prioritizing clarity and brevity may be more important than micro-optimizing. The key is to be intentional.
Related Tools and Resources
- eslint-plugin-react-perf – Lints for common performance pitfalls, including inline functions
- why-did-you-render – Highlights unnecessary renders caused by prop identity changes
9. Profile and Measure Continuously
React performance optimization isn’t a one-time task — it’s an ongoing process. Modern front-end applications are dynamic and evolve rapidly, and what works today can become a bottleneck tomorrow. That’s why continuous profiling and real-user monitoring (RUM) are essential to sustaining performance over time.
Put simply: you can’t fix what you don’t measure.
Why Profiling Matters
Blind optimization often leads to wasted effort, or worse, negative results. Without visibility into what’s actually slow — or why — developers may:
- Optimize low-impact components
- Misuse React.memo, useCallback, or useMemo
- Obscure component logic without improving render times
At Growin, our front-end teams treat profiling as a core step in both development and review cycles. Whether building from scratch or refactoring legacy code, performance decisions are made based on measurable evidence, not gut feeling.
Tools for Component-Level Profiling
1. React DevTools Profiler
React’s built-in Profiler shows:
- Which components rendered
- How long each render took
- Why a component rendered (e.g., prop or state change)
- Flamegraph and ranked views for identifying bottlenecks
Ideal for local debugging and identifying performance hot spots during development.
2. why-did-you-render
This developer tool patches React to log when components re-render unnecessarily.
Example output:

Use it during development to prevent wasteful re-renders — especially in combination with React.memo.
3. Chrome DevTools Performance Tab
Use the browser’s Performance tab to record:
- Frame drops
- Long tasks
- Paint and layout timing
- JavaScript execution time
Pair this with memory snapshots and event tracing to detect layout thrashing or React logic that blocks the main thread.
Real-User Performance Monitoring
Beyond local profiling, real-world performance is what actually matters. Tracking how your app performs in production, across different devices and network conditions, gives you the data you need to improve UX where it counts.
Web Vitals: What to Track
- First Contentful Paint (FCP) – When users first see content
- Interaction to Next Paint (INP) – Measures input responsiveness
- Largest Contentful Paint (LCP) – Measures visual load completion
- Total Blocking Time (TBT) – Time spent blocked on JS during load
Track these using:
- Lighthouse for one-time audits
- Web Vitals JS for reporting real-user data
- Monitoring platforms like Vercel Analytics, Sentry, New Relic, or Datadog
Integrate Profiling Into Your Workflow
- Profile components during code reviews (especially for shared libraries or UI kits)
- Use why-did-you-render in dev mode for catch-all regressions
- Automate Web Vitals reporting in production with alerts or dashboards
- Review flamegraphs regularly after major feature releases or refactors
10. Server Components (If You’re Using Next.js)
If you’re building with Next.js App Router in 2025, you already have access to one of React’s most powerful performance features: Server Components. These allow you to render parts of your UI on the server — without sending the associated JavaScript to the client at all.
For performance-conscious teams, Server Components are a major architectural shift. They reduce bundle size, speed up initial loads, and eliminate unnecessary client-side rendering. But to use them effectively, you need to understand when and how to apply them.
What Are React Server Components?
React Server Components (RSCs) are components that:
- Render only on the server
- Do not include client-side JavaScript
- Can fetch data directly (no client-side loading needed)
- Can be composed with regular client components
They enable a new pattern where only interactive components ship to the browser — while static or read-only UI is rendered fully on the server.
This architecture helps reduce:
- JavaScript bundle size
- Hydration time
- Time to first paint
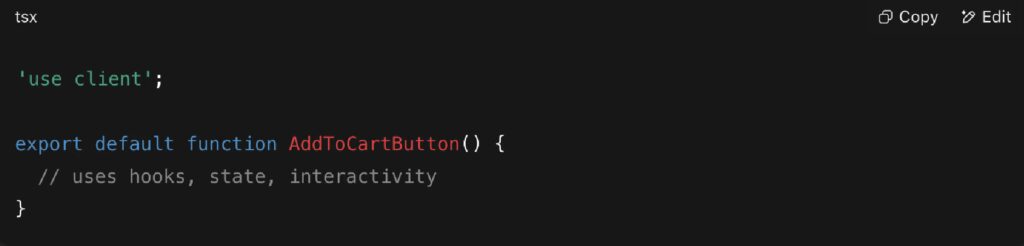
Example: Static Layout, Interactive Widget
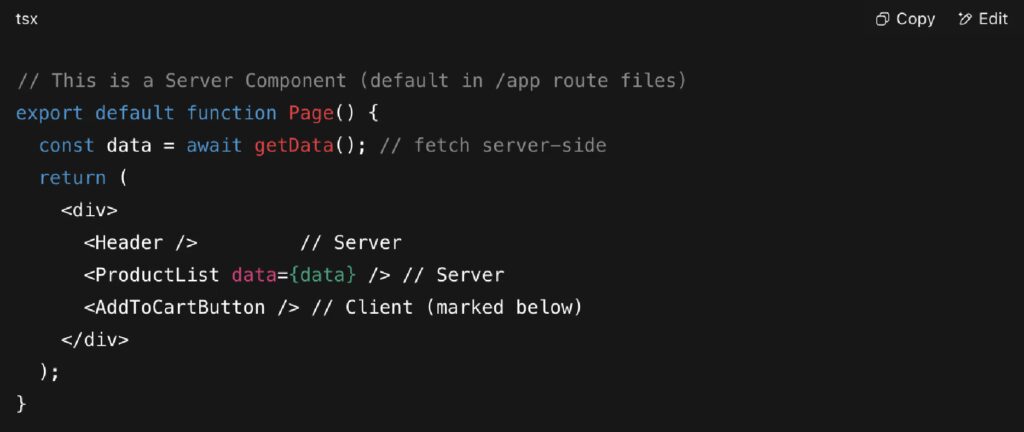
The only interactive part — AddToCartButton — needs client-side JS. Everything else is delivered pre-rendered, no hydration or JS needed on the client.
To mark a file as client-side:
Benefits of Using Server Components
- Smaller JavaScript Bundles
By not sending static logic to the client, bundles shrink considerably. This improves performance across low-power devices and slow connections. - No Double Fetching
Server Components can fetch data directly, without relying on useEffect or SWR on the client. - Faster First Paint + TTI
Less client JS = faster hydration and interactivity. - Cleaner Separation of Concerns
Non-interactive UI (headers, product listings, descriptions) can live purely on the server, reducing complexity.
This is especially valuable for e-commerce, dashboards, blogs, or any UI with heavy read-only sections and isolated interactivity.
Considerations and Limitations
- Only works in Next.js App Router (not traditional Pages Router)
- Requires Node.js or edge runtime — not static export
- Cannot use state, useEffect, or client-only libraries in Server Components
- Must manage the boundary between server and client components carefully
You can learn more about the best practices and benefits of using Server Components here.
When to Use Server Components
- Static or read-only UI (e.g., content pages, product listings, tables)
- Data-driven content fetched from APIs or databases
- Reducing bundle weight and hydration costs
- Improving mobile and low-end device performance
When Not to Use Them
- UI that depends on local state, client-side hooks, or browser APIs
- Components that must react to user interaction immediately (e.g., modals, inputs, dropdowns)
If you’re unsure, default to server components and “opt-in” to client behavior with use client.
Build Faster, Smoother, Smarter React Apps
Performance is no longer just a “nice-to-have” — it’s a baseline user expectation. In 2025, the web is more competitive, mobile-heavy, and UX-driven than ever before. If your React app doesn’t load fast, scroll smoothly, and respond instantly, users will notice — and so will search engines.
That’s where React performance optimization becomes essential. By applying the strategies in this guide, you’ll:
- Improve perceived and real load time
- Reduce unnecessary rendering and resource usage
- Scale your application without sacrificing interactivity
- Future-proof your front-end architecture with modern React patterns
Whether you’re just starting to profile your app or already exploring Server Components in Next.js, one principle remains consistent: measure before you optimize. Every decision should be data-backed, intentional, and aligned with the user experience you want to deliver.
Need help auditing, optimizing, or scaling your React project?
Growin’s front-end team specializes in building high-performance React applications that scale using the best react performance optimization practices. Let’s talk.