Before we get into the real topic of this article _Clean Architecture_ let me tell you a story about Robert Martin’s son.
Someday, Robert Martin´s son showed him a directory structure for one system. After analyzing it, he concluded that it was a Ruby on Rails architecture and did not like the fact that this structure was informing the technology that was being used, not the type of application. This bothered him because, in the real world, we see that the architecture of buildings, churches, and other structures inform their intended use.
We’ve seen some architecture systems like Hexagonal Architecture, Onion Architecture, BCE, and others around the years. Robert Martin (Uncle Bob) noticed in his researches that there are many similarities between all of them.
They each split and divide the software into layers, each has one business layer and one layer that supplies the interface for the final use.
The similarities include being
- independent of frameworks,
- testable,
- independent of UI,
- independent of the database,
- and having isolated layers.
Despite being authored by Robert Martin, he didn’t just create clean architecture, he simply gathered the best practices and similarities of the best architectures we have on the market.
Why use clean architecture?
The general objective is to decrease the application coupling so that we can reuse business rules whenever we want.
We need to test each business rule for the application in isolation and ensure that each rule is being applied without interference from any externalities, or objects that we have no control over, but this is something that developers already know.
We need each layer of the application to be isolated and not have knowledge of how they work, for example, the core of the application has no need to know which database that it needs to access, or which SPI needs to make a request or something it just needs to understand about the business that is being built.
If we have a version of the WEB application and it will have to be built new or modified the same way for desktop or mobile, this will be a difficult task. If we have a clean architecture, it shouldn’t be a problem.
The Dependency rule
Now that we have the background, the history, and why to use it, let’s explain each layer.
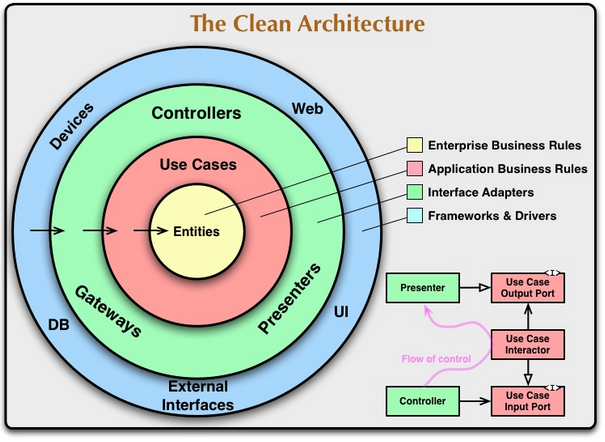
The only form of conversation between these layers would be through interfaces following the principle of dependency inversion (DIP).
In statically typed languages, we must only access the the interfaces, not the concrete modules.
In this specific context, we can conceptualize it as any module in which the called functions are implemented.
Entities
An entity can be an object with methods or a set of data structures and functions, it doesn’t matter. They are the objects of application, the most general rules.
Use cases
This layer is where the business rules are applied, and where the use cases are implemented.
The data flow is orchestrated from the entities and guides them to ultimately achieve the objective of their use case.
The changes in this layer do not affect the entities and we don’t need to worry if some UI changes affect the use case. For example, if you need to change a Class Component to Function Component it won’t affect the implementation of the business rule.
Interface Adapters
In this layer, the adapters convert the data to the format used in the layers below (use cases, entities), This is where we built the MVC architecture for the GUI.
The Presenters, Views, and Controllers all belong here.
Frameworks and Drivers.
The outermost layer it is composed of frameworks and tools as a database. Normally there is not much programming here, just configurations or associations that establish a communication with the internal circle
What do we do?
After a brief refresher on the concepts, we need to put this into practice.
We need to create a login page for to-do list applications. So, what does this page need to contain?
The login must have: state fields, a submit button, fields validation, error handling, and the style. The button must send a HttpPost request to servers.
The state fields for our application are two input fields, one for email and the other for passwords.
We have an authentication use case and validation layer to check if the fields are filled or not, and an infrastructure layer that performs the HTTP request.
Presentation layer (Interface Adapter)
In this layer, we have the components, pages, and styles for the application.
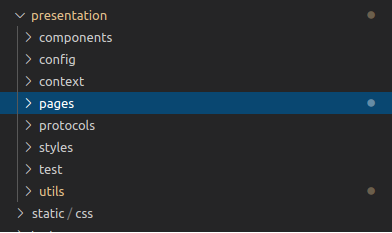
Img 1.0
The login component must not know how the authentication or validation fields functions are implemented. Then it will receive these functions in the props.
type Props = {
 validation: Validation,
 authentication: Authentication
 }
 const Login: React.FC = ({ validation, authentication }: Props) => {
We separated the interfaces into a Domain Layer (I’ll talk about this more later on).
export type AccountModel = {
 accessToken: string
 }
 export type AuthenticationParms = {
 email: string,
 password: string
 }
 export interface Authentication {
 auth(params: AuthenticationParms): Promise
 }
The Authentication interface shows that whoever is going to implement it needs a method called Auth that has email and password as parameters and returns a start with the authentication token.
First, we define the type ‘props’ and then we guarantee that it can only be possible to use the login component by sending these two functions.
We need a layer that manages this and does these injections, which is where the main layer comes in.
Main Layer
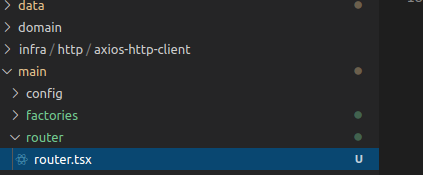
Img 2.0
The main layer is where the dependencies are managed. Here you can access all of the layers.
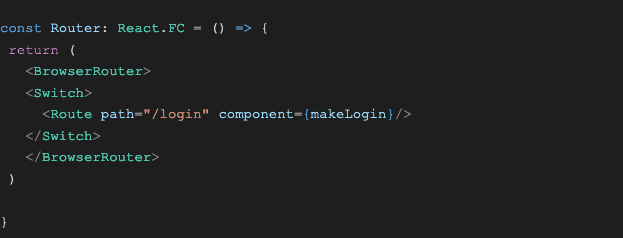
The login route calls a factory which creates a login component.
const makeLogin: React.FC = () => {
 return (
 <Login
 validation={makeLoginValidation()}
 authentication={makeAuthentication()}
 />
 )
 }
 export const makeAuthentication = () => {
 return new RemoteAuthentication(makeApiUrl('/login'), makeAxiosHttpClient())
 }
Data Layer and Domain Layer (UseCases)
In the domain layer, I chose to make the use case interface definitions.
The data layer is where the implementation exists (It was done this way to be better separated, but it is not necessary).
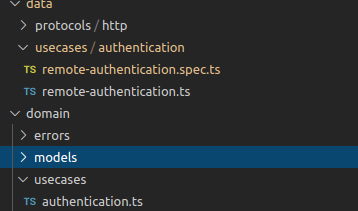
Img 2.4
export default class RemoteAuthentication implements Authentication {
 constructor(
 private readonly url: string,
 private readonly httpPostClient: HttpPostClient<AuthenticationParms, AccountModel>
 ) { }
 async auth(params: AuthenticationParms): Promise {
 const httpResponse = await this.httpPostClient.post({url: this.url, body: params})
 switch (httpResponse.statusCode) {
 . . . Switch
 }
 }
 }
That is the implementation from the RemoteAuthenticaton we can see using the AuthenticationParams that was defined in img.1.2
In the builder of the class, we see that in order to be created it needs a URL and an httpPostClient. If we go back to image 2.3, we can clearly see that a factory is created in the class builder for the URL and another one where the httpPostClient is created.
Remember that the authentication method does not need to know at any time how the HTTP call is made if Axios, or fetch, will be used. This is not important for the scope of this method.
Before going to the infrastructure layer and recapitulating the main layer a little, below you will see the factories for creating the URL and httpclient:
export const makeApiUrl = (path: string): string => `${process.env.API_URL}${path}`
import { AxiosHttpClient } from "@/infra/http/axios-http-client/axios-http-client";
 export const makeAxiosHttpClient = (): AxiosHttpClient => new AxiosHttpClient()
Infra Layer (Interface Adapter)

In this layer, you can define which database you will use in the application (if it is a back-end), how the HTTP call will be made, and any integration external to the application. Here is where we define and say how it will happen.
import axios from 'axios'
 export class AxiosHttpClient implements HttpPostClient<any, any> {
 async post(params: HttpPostParams): Promise {
 const httpResponse = await axios.post(params.url, params.body)
 return {
 statusCode: httpResponse.status,
 body: httpResponse.data
 }
 }
 }
To conclude…
From what we saw, the application is well divided, which makes unit testing much easier, and if we want to plug a layer into another application, we will do it easily.
If you want to read more about this topic, I have some videos and courses to recommend that are very interesting, such as:
https://www.udemy.com/course/react-com-mango/learn/lecture/19801216?start=120#notes (Excellent course to understand how architecture works with a react application, it teaches you step-by-step, he has more courses on the subject with other technologies if you are interested in nodejs or flutter)
https://blog.cleancoder.com/uncle-bob/2012/08/13/the-clean-architecture.html
https://www.amazon.com/Clean-Architecture-Craftsmans-Software-Structure/dp/0134494164